What Makes Vinyl Plank Flooring Different from Other Flooring Types: An Vinyl Plank Flooring Installation Guide
In recent years with homeowners wanting stylish yet durable flooring options, Vinyl plank flooring has become a sought after choice. Featuring natural wood looks better than the real thing, offering a plethora of design options in every conceivable aesthetic and configuration.
For detailed information about home flooring, don’t miss our Flooring Face-Off: What is the Most Popular Flooring in 2024
What Advantages of Vinyl Plank Flooring
There are many reasons why people love vinyl planks so much including:
- Hard-wearing: Vinyl plank flooring is extremely durable and can handle high pedestrian traffic, scratches, and dents Vinyl is a good flooring option for kitchens, hallways, and living rooms as it can stand up to traffic.
- Water Resistant: Vinyl planks are water-resistant, this is a big positive when compared to traditional hardwood (which has a tendency of warping if exposed to moisture) and makes it the perfect flooring for rooms susceptible to spills/moisture like bathrooms, kitchens or laundry rooms.
- Real hardwood would probably be similar in cost or more, and vinyl plank is the final product so it saves both time and money.
Easy to Install: Many vinyl planks are made with click-lock systems, making installation quick and easy for even beginner - DIYers. It can save you dollars in labor compared to professional installation.
- Ease of Maintenance: Vinyl plank is incredibly easy to clean, simply sweep or mop regularly! If you have a busy home, this is an excellent maintenance free option.
Types of Vinyl Plank Flooring
Vinyl planking comes in many styles and has different installation methods including, but not limited to:
- Glue-down vinyl planks: This flooring uses the adhesive or consider as a strong bonding to affix each plank on the sub-floor. This type delivers a very permanent and stiff installation, which is perfect for the high-traffic zones.
- Floating Vinyl Planks Floating vinyl planks are made with the click-lock system so they can be interlocked without using any kind of adhesive. They are installed in such a way that when you want to take them off, it is less difficult than taking off something like the Top Cold Air Intake.
- Loose-Lay Vinyl Planks: This type of vinyl planks is backed with a rubber grip that grips onto the subflooring and does not require adhesive. They are easy to install and work well on uneven subfloors.
- Click-Lock Vinyl (Floating) Planks Click-lock floating vinyl planks are very popular because of its click locking system. A pre-attached underlayment: These make the installation process that much easier.
DIY VS Professional Installation
Before you make the decision to install your own vinyl plank flooring, consider the pros and cons of DIY versus professional installation:
DIY Installation:
- Benefits: save money, sense of accomplishment and more control over the process.
- Cons: Time-consuming and cumbersome process, skills required with possible mistakes / low warranty coverage.
Professional Installation:
- Benefits: Professional knowledge, quality results, extended warranty protection.
- The Bottom Pros Higher cost Cons Less control over the project Scheduling limitations
In the end, it all comes down to how you work best…and perhaps also how much free time — and cash — you have at hand. So if you are comfortable with DIY and have the time, DIY installation can be a fun process. For many people this is a downside, but if you want more professional results, have them done by a qualified installer.
Project Scope & Planning
Vinyl Plank Flooring,Wonderful Vinyl Plank flooring installation rests on careful planning. This will ensure a successful, hassle-free project:
- Measure Your Room: Measure the accurate length and width of the room where you intend to install the flooring.
- Calculate Required Materials: Based on your room’s dimensions and the size of the vinyl planks, calculate exactly how many planks you will need. Moreover, always add a 10% buffer to cover the waste and potential mistakes.
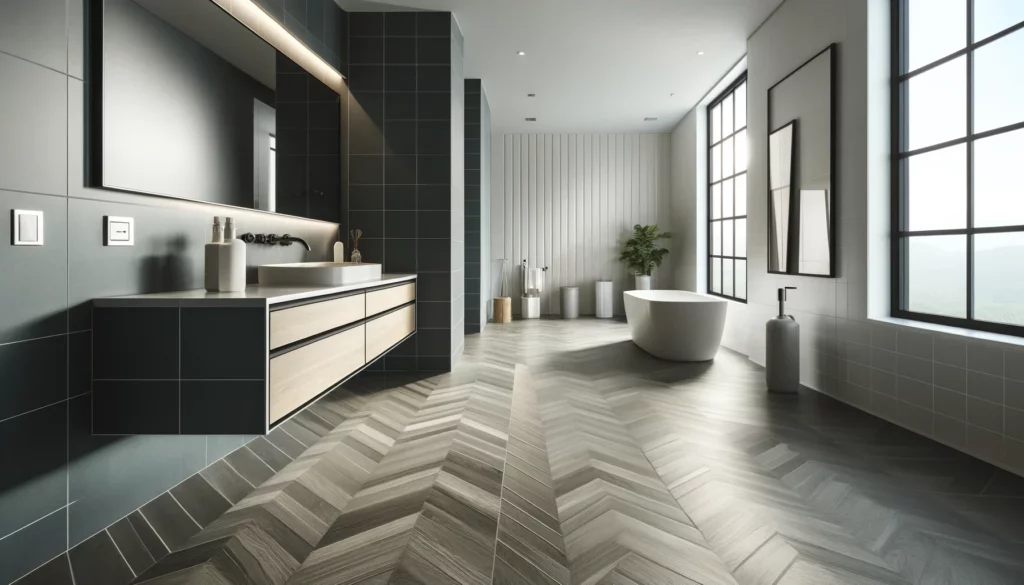
- Consider Layout Options: You should think about the layout of your vinyl plank flooring. Either a straight layout or more intricate patterns, like herringbone or chevron, and many more.
- Gather Tools and Materials: Tape all the necessary tools and materials before you start such a project. A good checklist will save you time and effort.
- Preparing Your Subfloor for Vinyl Plank Flooring Installation A vinyl plank flooring installation depends heavily on a well-prepared subfloor. A good subfloor should be smooth, level, and dry.
Understanding Subfloor Requirements
Vinyl plank flooring needs the following conditions:
- Level: A level subfloor will ensure that the vinyl planks rest flatly and evenly. A level tolerance is within 1/8-inch difference in an 8-foot span.
- Clean: A clean subfloor is important because dust and debris can disrupt the adhesive bond or the click-lock system.
- Dry: Ensure that your subfloor is completely dry before you install your new flooring. Subfloor Issue A professional should help you to assess your subfloor:
- Leveling and flatness: It should not exceed 1/8 inch per 6-10 feet.
- Issues include protruding nail heads and debris such as dust and dirt.
- Moisture and humidity concerns.
- Find High and Low Spots: Common sense here would dictate you’d use a level to look for dips or rises in your old flooring.
- Source: Signs of water damage, such as dampness, discoloration or mold growth.
- Damages — Looking for cracks, holes or loose boards which can lead to subfloor failure.
Subfloor Repair Techniques
After you have noticed any of these subfloor problems, then correction is to apply for either one among the repair methods.
- Smoothing: if the unevenness is not higher, then it may possible with self-leveling compound or thinset mortar to create a flat level surface.
- Repair any Holes or Cracks: Patching The damaged area will need to be patched either with wood filler, epoxy or concrete patch.
- If you have indications of moisture in your subfloor, it may be necessary to install a moisture barrier or replace the compromised subfloor material.
Selecting the Proper Underlayment
Benefits of Using Underlayment in Vinyl Plank Flooring Installation
- Sound Reduction: More cushioning material under the flooring provides a quieter, more comfortable living space.
- In order to give that comfort, it adds a layer of cushioning and reduce the impact noise on your flooring.
- Safeguards Against Moisture: Your vinyl planks are protected against moisture from harming the subfloor with underlayment.
There are Different Underlayments Available and They Each Have Their Own Benefits:
| Underlayment Type | Benefits |
|---|---|
| Foam Underlayment | Affordable, offers excellent cushioning and soundproofing. |
| Cork Underlayment | Eco-friendly, provides good cushioning, sound absorption, and moisture resistance. |
| Felt Underlayment | Natural material, offers excellent sound absorption and cushioning. |
Natural material with sound absorption and cushioning properties.
Depending on your individual tastes and needs, the best underlayment choice varies from person to person. It is essential to decide if you want your floor that gives good soundproofing and a lot of cushion from underneath or can stay free of water because it will help make easy choice between these floors.
What You Need to Install Vinyl Plank Flooring
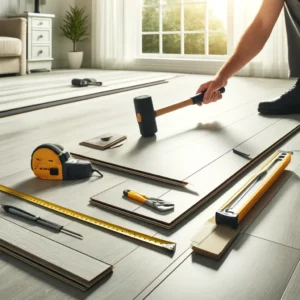
In order to install your LVP floor like a pro, you will need the right kind of tools and materials. The list of Basic tools, materials and recommended brands that you need to get start can be found in this chapter.
Gathering Essential Tools
Tools You Need for Application of Vinyl Plank Flooring
Measuring Tools:
- Tape measure: measuring the room, planks and cutting lengths accurately requires a 25′ tape.
- Square with Carpenter: Keep a carpenter’s square handy to make sure that the cuts are cut in 90 degrees for a clean and neat finish.
- Bubble Level: A 4-foot level is needed to ensure that the subfloor is level and it also helps to check in order for the planks installed are placed on even.
Cutting Tools:
- Utility Knife A utility knife will be helpful when cutting new planks, especially for shorter pieces and trimming around obstacles.
- A circular saw is great for making cuts on longer lengths of vinyl planks in which you have the ability to cut multiple planks at once.
- Table Saw: If you are cutting multiple vinyl planks, a table saw gives consistent cuts so that lengths.
Circular Saw: For the general straight line cuts, try to use a circular saw and it will make your cutting experience much better - Jigsaw: If you want to cut curves, fixtures or pipes then jigsaw is one of the best tools in my opinion for laying down vinyl planks cause most of them are so curved.
Installation Tools:
- Wedge (Tapping) Block: Use a wedge block to snug the planks side by side.
- Rubber Mallet: This will give you something to bang against the planks without damaging them.
- Pull bar: This tool is used to force boards together, which can be very helpful with the last few.
- Spacers: Spacers are the little pieces of plastic or wood that keep a consistent expansion gap between planks, for movement without buckling.
Safety Equipment:
- Protective Glasses: As you cut the planks always wear safety glass goggles to protect your eyes from any flying debris.
- Work Gloves: wear work gloves to keep your hands presumably clean and safe from cuts and splinters.
- Dust Mask: Use a dust mask to avoid breathing in any dirt and fumes produced during cutting and when it is installed.
- Knee Pads: Using knee pads is going to keep your knees from discomfort when you are working on the floor for long periods of time.
Materials Checklist
Vinyl Plank Flooring Installation Material Checklist
- Vinyl Planks · Type, Style, And Color Of Vinyl Planks → Read more
- Underlayment: Choose the best underlayment depending upon your subfloor condition as well as what benefits you are looking for soundproofing, cushioning and moisture protection.
- Spacers: Find spacers that match your vinyl plank flooring.
- Transition Strips: If your project is changing flooring types, you may need transition strips so come up with the perfect finish.
Recommended Brands
Select names that are trusted for vinyl planks and underlayment
Vinyl Plank Flooring:
- Shaw: Wide selection of textures, colors and features; designed long-lasting and warranties offered.
- CoreLife: The brand is famous for its core technology which provides great water resistance, durability and sound proofing.
- Armstrong: A reliable name in the industry for more than 100 years and one of the first major manufacturers to offer luxury vinyl plank with a variety of installation methods.
Underlayment:
- Roberts: Many variations in underlayments for various applications and requirements.
- Tarkett: Offers quiet and comfortable underlayment
- Mohawk: This company provides underlayment that boosts the life and performance of vinyl plank flooring.
Budgeting and Cost Awareness
There are many factors to consider to determine the price of your vinyl plank flooring installation.
- Cost Of Vinyl Plank Flooring: Prices vary based on the quality, brand, style and features of the vinyl planks you select.
- Underlayment Prices: Underlayment costs depend on the type you choose, with foam being the cheapest and cork or felt underlayments a little bit pricier.
- Tools and Materials: Include the cost of tools like a circular jigsaw, with its tapping block, as well as transition strips, trim.
Explore Practical Cost Saving Ways:
- Comparison prices: Compare the price from multiple retailers and buy based on discount
- Do-It-Yourself : This one goes without saying but laying your own luxury vinyl flooring can save you the cost of labour.
Step By Step Guide- Installing Vinyl Plank Flooring
Time to Begin InstallationNow that you’ve collected your tools and materials, prepped the subfloor– you are now ready for installation. We cover the whole process from A-Z in this chapter, which will give you a clear idea on how to install vinyl plank flooring.
How To Figure Out What’s Right For You
Since they are the 10mm option, I will go over how to install them throughout your room :
- Start with full planks: If possible start in a corner where you can put as many whole length boards down first.
- Layout Selection: choose your layout style. Pick a classic straight-lay, or one of their more complex patterns like herringbone or chevron.
- Stagger Planks: Stagger the end joints of balance next leaders to effect a monotonous, pleasant indication and stable deck.
Installing the First Row
- Lay Down the First Plank: Start by laying the first plank along one wall, ensuring it is flush with both the floor and your reference line.
- Use Spacers to Leave expansion gap between First Plank and Wall. This permits motion and stops the materials from bungling.
- Install the First Plank: To secure other plank in place, use a tapping block and rubber mallet to tap it into place.
Installing Subsequent Rows
- Interlock Planks: Install the first plank of the second row by engaging the tongue of the plank with corresponding groove on plank in first-row.
- Keep in Line: Use a level to make sure the planks within every row are aligned and consistent with the previous.
- Lock It in Place: Tap with a tapping block and rubber mallet to get the planks seated in their final place.
- Install Around Obstacles: Position planks around obstacles so they fit tightly and expansion gaps are maintained.
Cutting & Trimming Planks
- Making the cuts: Depending on the length and shape of the cut you need, a utility knife, table saw or circular saw makes easy work of cutting vinyl planks.
- Cutting along lines: Always use a straightedge when cutting vinyl planks to keep the cut line clean and exact.
- Neat Fit: Reasonably trim planks to suit round obstacles and create a clean, even transition.
Once you have followed these steps, you can then take solace in knowing that your vinyl plank flooring installation is both successful and professional-looking. Make sure you bead these carefully and take your time for best results.
Vinyl Plank Installation | Final Touches and Care
After you have installed your vinyl plank flooring (fabulous job), it’s time to place the finishing touches, and learn how to care for your new floor so that its beauty can stand against time! In this chapter, you will learn about important things to do after your project and how to practice care for your vinyl plank flooring.
Transition Strips & Trim
Your room should have a transition strips, so that the transition between different types of flooring is seamless. They create a nice transition with your new vinyl plank flooring and other surfaces.
- Types of Transition Strips — Go for transition strips that go well with your type of flooring and adjust the height difference between the floors in question.
- Installation: install the transition strips as per the manufacturer instructions. Depending on what they are, you can use adhesive, nails or screws to secure them.
- Caulk and transitions :where planks meet other surfaces, like tile or carpet
Trim: Handles the edges of the vinyl plank flooring to make a beautiful clean finish.
- Available Types of Trim: Baseboards, shoe molding and quarter-round molding are the most common trim options.
- How to Install: Fix the baseboard with adhesive, nails or screws as per the theme or your liking.
- Positioning: Place trim near the walls in order to wrap cushion air gaps and provide a finished appearance.
Baseboards & Molding
As the floor has continuous usage, make sure to install baseboards alongside it to cover up that expansion gap between your vinyl plank and wall. It is also a way to add appeal in a room.
- Baseboard Choice – You should select baseboards that are consistent with the style of your vinyl plank flooring and have proper alignment with an overall design of the room.
- Installation: Baseboards can be installed by adhesive, nails or screws. Just choose the method that is perfect for your kind of baseboard and structure of wall.
- Amicable: make the baseboard aligned flat and parallel to the wall
Shoe Molding is similar to quarter-round, shoe molding is a small piece of trim that is used between the baseboards and floor coverings.
- Shoe mold is placed along the perimeter of baseboards to hide these gaps and allow for expansion while providing a seamless transition from floor to wall.
Cleaning & Maintenance
Vinyl plank floor is easy to clean and care for and only needs a little effort to maintain its clean look.
-
Regular Sweeping. It is necessary to sweep the floor to eliminate dust, dirt, and debris.
-
Mopping. Mix a mild cleaning solution with a damp mop to mop the floor. Do not use harsh cleaning agents or abrasives to avoid scratching or damaging the vinyl.
-
Spot Cleaning. Clean the spot using specialized vinyl cleaner or mild soap for any stubborn stain.
Troubleshooting Common Installation Issues
Although installing vinyl plank flooring is relatively easy, some common issues may appear. If planks are released from the ground or do not stand evenly with one another, the following actions may be taken:
-
Uneven Planks. Tap the block with a rubber mallet to straighten the planks out.
-
Click-Lock Issues. Make sure the tongue and groove sections are lined up properly. You may need to use a pull bar to a more locked joint.
-
Gaps Between Planks. Tap the blocks with the rubber mallet. It may be necessary to consult the installation manual about keeping the right amounts between the planks. If they still refuse to remain together, there may be an issue with the gripper.
- Installation Methods: Watch Installation Videos and be aware of correct installation ie alignment, overlapping, expansion gap etc.
- Finishing touches: Transition strips, trim and baseboards give your new floor a professional fit and finish.
- Upkeep: With routine cleaning and maintenance, vinyl plank flooring will keep its beautiful appearance and last for a long time.
Benefits & Satisfaction
Completing your own DIY project is a fantastic sense of accomplishment. Not only have you saved money, but you can brag of valuable skills and knowledge. Here are just a few of the benefits your new vinyl plank flooring provides;
- Durable: A worry-free flooring that holds up very well against any type of traffic, scratch or dent.
- This water resistance surely enables you that your floor is safe from spills and moisture.
- Ease of Care: Keep your new flooring as clean as possible in less time.
- Beauty: Facelift your space with a trendy and modern flooring variation
Should you write more in the future
Completing such a project will give you the confidence to tackle other projects around your home, too. Use this time as an opportunity to learn new skills and make some needed home improvements. Remember, a little planning, the right tools and elbow grease go a long way, whether you take on an entire kitchen remodel or bathroom upgrade – even just giving new life to with some wallpaper or paint.
It simply means that the work you put into vinyl plank flooring is a reflection of your commitment to make every corner or space of your home functional and beautiful.
Vinyl Plank Flooring Installation: Frequently Asked Questions
What Is the Best Subfloor for Vinyl Plank Flooring?
The perfect subfloor for vinyl plank flooring is clean, level and dry. An even subfloor prevents end gaps and bucking, stable ensures proper adhesion or click-together of the planks. Unevenness or moisture in the SubfloorYou may need to repair your subfloor if it has issues such as unevenness and/or moisture before you can install laminate.
Underlayment for Vinyl Plank Flooring: Do I Need It?
The type of vinyl plank flooring you select and the condition of your subfloor will determine whether or not you need underlayment. One option people forgot to consider is underlayment. Underlayment is generally recommended for a concrete subfloor or if you wish to minimize noise. On the other hand, it is important to note that some click-lock vinyl planks/ tiles have a pre-attached underlay and do not require additional underlayment. Follow the guidelines provided by the manufacturer
How To Cut Vinyl Plank Flooring Around A Hole
When it comes to trimming vinyl plank around obstacles, accuracy is key and cuts need to be extra careful. For that small of a cut, you want to use your utility knife for smaller cuts and your circular saw or jigsaw (for larger/ intricate cuts) Use a straightedge to keep your cuts properly aligned, Make sure you cutting tool is sharp. We may have Dual measured yet in this game, but we were able to dodging much of any slips.